Homeless in Vancouver: Replacing a bike saddle—easier to do than explain
On Saturday (September 4) before I went to bed, I replaced the saddle on my bicycle.
I only mention the fact because that’s what this post is about—the steps I go through to remove and replace a bike saddle (or seat).
Homeless cyclists, such as myself, put big demands on our bicycles. I routinely cover more than 30 kilometres a day on mine and I haul a trailer in order to collect loads of returnable beverage containers up to 45 kilos in weight.
No surprise then that between my bicycle and trailer, there are always things, major and minor, that need fixing or replacing.
My bike saddle has been one of the minor things that’s needed replacing for a few months now (I wear out one or two of them a year), and Saturday evening on my way to bed, I came across a good-quality, near-new Velo-brand bike saddle that someone had left out beside their apartment’s container recycling bin.
Removing and replacing a bicycle saddle is no big deal so I did it first thing after I arrived at my sleeping spot.
My personal recipe for removing a bike saddle
There are four things that I need in the way of tools and equipment in order to remove and replace a bicycle saddle:
- Duct tape (I’m Canadian after all)
- A hex wrench (or Allen key) set
- A common flat-blade (or slot-head) screwdriver
- One metal hose clamp with a four-inch circumference
It’s not absolutely necessary but I prefer to remove the saddle on its post from the bicycle before removing the saddle itself.
So my first step is to take a piece of duct tape and wrap it around the seat post so that the bottom edge of the tape marks exactly how far the post slides into the seat tube of the bicycle frame.
Then, in another step unique to me, I used a flat-head screwdriver to loosen a hose clamp tightened around the quick release lever holding the seat post firmly in the seat tube (more on that later).
Removing the saddle from the seat post

Both my present saddle and the replacement, attached to the seat post in the common way—using two rails fixed to the underside of the saddle and held tight in the grip of a two-piece butterfly clamp at the top end of the seat post.
Freeing the saddle from the post means using an hex wench (six millimetre, I think) to loosen the hex bolt that is holding the two haves of the butterfly clamp tight to the seat rails.
The rails on the seat are deliberately longer than the butterfly clamp to allow a range of saddle adjustment forward and back. So first I make a mental note of where the butterfly clamp and saddle rails attach to each other on the old saddle so that I can try to do the same thing with the new one.
I then loosen the hex bolt just enough so that I can turn the top plate of the butterfly clamp 90 degrees—this allowed me to just lift old the saddle off and put the new saddle on.
Then it’s a matter of turning the butterfly clamp back 90 degrees and tightening the hex bolt. (Note: I’m trying to duplicate the position of the old saddle relative to the seat post but I still expect to have to loosen and tinker with it a bit after I’ve fixed the seat post back in the seat tube.)
Putting the seat post back in the bike frame
 Stanley Q. Woodvine
 Once the saddle is fixed to the seat post, I insert the post back into the seat tube up to the bottom edge of duct tape. I then turn the saddle until it is perfectly in line with the top horizontal tube of the bicycle and then I close the lever of the quick release, making sure that it is holding the seat post very, very firmly.
If the lever closes and opens easily, then it needs to be tightened.
The lever is attached to a screw—with the lever in the open position, I hold the nut on the other end of the screw and rotate the lever clockwise one full turn and then check if it closes firmly enough. I repeat this as needed until the lever closes with a bit of effort and is likewise difficult to open again.
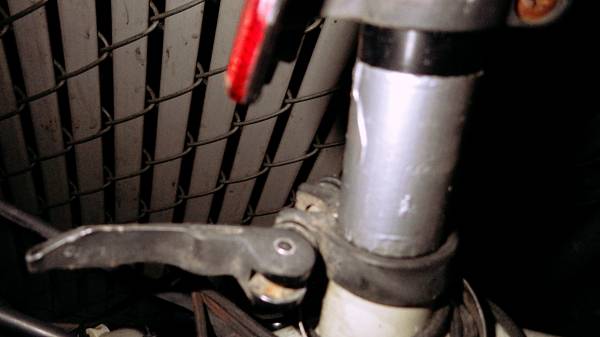
Like all my fixes, this one ends with a hose clamp
 Stanley Q. Woodvine
 My final step involves tightening a steel hose clamp around the seat post quick release and, if possible, putting a dab of silicon filler or rubber cement in the hex bolt hole of the butterfly clamp.
This is simple theft deterrent in lieu of removing the saddle and seat post every time I lock the bicycle up somewhere. It won’t stop someone from stealing the saddle but it will reduce the field to would-be thieves carrying screwdrivers and/or appropriate hex wrenches and it will make them take more time to commit the theft than they would like.
By the way, this isn’t just sheer laziness on my part. Putting the seat post in the seat tube and taking it taking out of the the seat tube, maybe three or four times a day, nearly every day of the year, results in significant wear to both, especially if either the seat post or the bike frame are made of aluminum.
Anyway, that’s one fix down and a bunch more to go.


Comments