Homeless in Vancouver: How to cook without a pot (hint: you make one)
August 15 I was gifted with a new backpacking stove (and one propane canister).
Earlier I had posted on my Twitter account how I was saving up for such a thing and another Twitter user generously offered to buy it for me and I didn’t refuse.
In essence, the tiny $44 MRS Pocket Rocket is little more than a high-precision adjustable brass and steel valve for dispensing compressed gas from squat little $8 screw-on propane canisters. The “little more” would be how it’s designed for igniting the dispensed gas and cooking things over the resulting super hot, ice-blue flame. There are three swing-out steel vanes to support a cooking pot just above the business end of the stove.
Therefore, on Sunday evening (August 21), armed with my little stove and a squat canister of propane, I had almost everything I needed to take advantage of the unopened bag of hard-frozen heat-and-serve perogies that I found in the topmost strata of a Fairview Dumpster; everything, that is, except a pot to heat them up in.
This post is actually more about how I conjured up the pot that I needed, in less than a third of the time that I spent using it to heat up the perogies.
Preparing for a potluck dinner, homeless-style

In an affluent neighbourhood like Fairview, if you can’t immediately find the exact thing that you need in the garbage (such as a pot) then you should at least be able to find the raw materials needed to make yourself a fair equivalent.
Everything in our society is so highly manufactured and from such sophisticated materials—including product packaging—that most of the nonorganic garbage we throw out is absolutely chock full of usable things—either suitable to be reused as is, or to be adapted or “repurposed”, often with little or no effort.
In the case of finding materials for my pot, I had already turned up a large 2L aluminum beer can in a Container recycling blue bin. This was sufficient for my immediate purpose, being about 30-cm tall, with a diameter of perhaps 12 to 13 cm. This left me needing a coat hanger. These usually occur in Fairview back alleys in feral packs of 20 or more but I found a solitary one hiding in a Dumpster.
Imagine making a pot, it’s easy if you try

The beer can was made from aluminum milled thinner than a sheet of paper and entirely owed its rigidity to the stamped-out shape of its bottom, as well as the crimped and folded steel collar that joined its cylindrical body to its conical lidded top.
The first step in making my impromptu pot was to take a pair of scissors and cut off that conical top. This left me with an open-topped cylinder that was almost too flimsy to pick up.
My second step was to break the hook off the coat hanger and then to straighten out the remaining wire. I preceded to bend this length of wire to trace out the combined circumference of my can as well as the length of handle that eyeballed measurements determined I could make from about a third of the height of the can.
An important detail is that the midpoint of the wire became the end of the traced-out pot handle, with the ends of the wire meeting at the far circumference of the can.
As a brief aside, steel wire coat hangers make excellent construction material. They offer both workability and strength. They can be easily bent with hands and pliers into shapes of great complexity and rigidity. The wire, being steel, is strong and flexible up to a predictable point, past which, it can be broken without cutters, just by repeatedly bending the wire back and forth in one spot.
Using pliers, I bent crimps in the wire at the points just before it stopped tracing the straight sides of the handle and began curving around the circumference of the can. This step is probably clearer in the images than in my explanation. It was done to add extra rigidity and strength but probably wasn’t essential.

My third step involved cutting away over a third of the top of the can. This was done in such a way as to:
- Leave a can-height strip of aluminum for the “skin” of the pot handle and;
- Leave at least a 2 cm fringe of excess aluminum around the final desired shape of the pot rim and handle, in order to provide sufficient material to fold around the wire form which I made in step two.
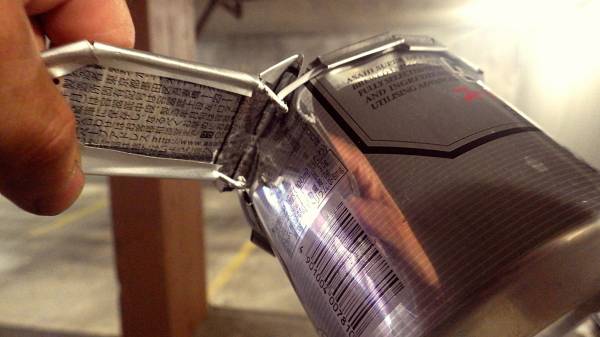
The fourth and final step involved seating the cut up aluminum can in the circlet of wire, so that the larger handle shape of the sheet aluminum was sitting exactly on the smaller handle contour of the steel wire.
Then it was just a matter of folding the excess 2 cm-or-so of fringe aluminum over and/or around the wire form. It was necessary to make spaced 2 cm cuts in the aluminum wherever it had to fold over curves in the wire—particularly around the circumference of the can.

The coat hanger wire was essential to both restore the rigidity of the can—lost when the top was cut off—and to brace the paper-thin aluminum handle so that it could bear the weight of the “pot” when it was full of water (and perogies).
Keep in mind that the rough look of the final result has nothing to do with the materials. It’s because I was measurably more interested in eating the aforementioned perogies than I was in making cookware.


Comments